

Scheduling Products
-
Select .
A list of available product types appears.
-
In Display, on the top of the menu, specify which sites are
displayed.
Value Description All Sites Show the schedule for all sites.
Master Show the Master Schedule, with one entry for each scheduled product.
If a product is scheduled to run at multiple sites, the entry shows the site that ran most recently.
Site Group Show the products that are configured for all sites in the group.
The Site Group is a subset of sites that is defined in the Site Group field.
Single Sites Show the products configured for a single site (select the site name). Use this if your system supports one site.
The adjacent text field shows how many products match the display selection.
-
In Add for, on the top of the menu, specify the sites for which
the product is added.
Value Description All Sites Add the product for all sites.
Site Group Add the product for all sites defined by the Site Group.
Tag with * the members of the site group. If you have a single site system, make your site the only member of the Site Group.
Single Sites Add the product only for that site. Use this if your system supports one site.
-
To edit the products configured in the product schedule, right-click the
Product field and select one of the following:
Value Description Add Add a product to the schedule.
The product is generated on an on-going basis when the task collects data, subject to the Skip time.
Remove Remove the selected product from the list for the site that is displayed.
If the Master Schedule is displayed, then the product is removed for all sites.
Edit Opens the Product Configuration menu for the selected product. -
To generate data only from future tasks:
-
If you use All requests, you can set the
Skip field so that the product generator does not process every
occurrence of the associated task.
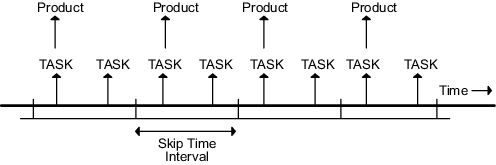
By default, an All request causes data from every task to be processed. The Skip time breaks the day into equal time intervals starting from midnight.
A product is generated, at most, once for each skip time interval. The first occurrence of data from the associated task is used for each interval.
For example, a Skip time of
00:15(15 minutes) means that the product is generated no more frequently than every 15 minutes, regardless of how often the associated task runs.In the following figure, the Skip field for an All request is set so that there are 2 occurrences of the task in each interval. Only the first occurrence is used to generate the product.
The default value of the Skip field is
00:00, indicating no tasks are skipped.When the Master Schedule is displayed, a change in the Skip Time is applied to all of the sites.

You must consider the task schedule when specifying the Skip time. During operation, the Next-Data-Time field changes to show the next possible time that the product can be generated. This depends on the Skip time and the request (All or Next) as follows:
Skip and Request Values Description Next Any Skip Time After completing a Next request, the Next-Data-Time field is reset to the data time (plus 1 second) of the task that was just processed.
This means that issuing another Next request processes the next occurrence of the associated task.
The Skip time is ignored.
All Skip Time = 00:00 The product is generated for every occurrence of the associated task.
The Next-Data-Time field is reset to the data time (plus 1 second) of the task that was just processed (identical to the Next request case).
This is the same as issuing a series of Next requests.
All Skip Time >00:00 The Skip field determines the earliest time that a new product can be generated.
After completing a product, the Next-Data-Time field is reset to the beginning time of the next skip time interval.
-
To generate data only from future tasks, right-click the Request
field.
Request Field Options Description All All associated task data collected after the next data time are processed.
The product is generated on an on-going basis when the task collects data, subject to the Skip time.
Next Only data from the next occurrence of the task, after the next data time, are processed.
The product is generated only once.
The Skip time is ignored.
Stop Stops the selected product's schedule. When the Master Schedule is displayed, a change in the Request is applied to all of the sites.
-
To generate products from old data, right-click the
Next-Data-Time field.
This allows you to generate products from task data received from another IRIS host or retrieved from tape.
The following example shows how Next-Data-Time interacts with All and Next request options.
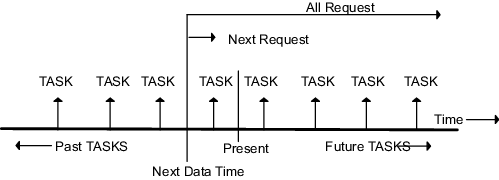
When a product is first loaded into the schedule, or an entire new schedule is loaded, the Next-Data-Time field defaults to the current time.
- In the Next-Data-Time column, right-click the time stamp.
- Select to go back in time.
- Select and give a name for the product scheduler.