
Playing Back Data
Use this menu is to review the contents of the recorded data files, and to check on the entire recording process. You can select any file for viewing, and display the rays individually or as a continuous loop.
You can invoke the Playback menu when Ascope is in its normal operation
mod, that is, acquiring live data from the DSP. It may also be used off-line (in a system
with no DSP) by initially starting the utility with the -demo option. Each
time you start the menu, the playback directory is rescanned for files that match the
Ascope naming convention. This collection of files is then
displayed in the scrolling list with timestamps.
Each time a new ray is requested from disk,
the data values displayed in the plotting area and all other numeric fields are updated
using information contained in the header files consisting of the time, TAG
bits and GPARM information. Also, the azimuth and elevation
angles are displayed, along with the current PRF, error bits, and so on, that were
originally measured with each ray.
-
Select .
The menu launches in record mode.
-
Select .
The Playback menu appears.
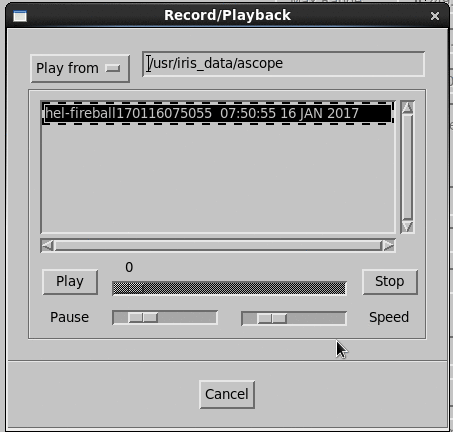
- Directory from which data files are played. By default, this is the same directory used for recording. If needed, change to any readable directory containing Ascope data files.
-
In the list of files, select the file you wish to playback.
The most recently recorded data are always at the top.
When you select a file, the Ascope configuration is reloaded from the header of the data file. This causes all menus and displays to return to the appearance that they had at the time the recording was made. The name displayed in the top title bar of the main menu changes to the name of the selected file.
- All Ascope menus are grayed out, except for the Play button and slide pots of the Playback menu. Ascope is now bound by the original selections of the highlighted data file.
- The data from the first ray are loaded from the file and plotted on the screen. The ray selection slide bar is initialized to its left edge (ray #0), and the time shown in the top title bar changes to the time of this first ray.
- Ascope waits in this state until the file is deselected or you exit the Playback menu. You can browse the recorded data set using the ray slide bar or the Play function.
-
Select Play and Stop to manage the movie
loop playback mode.
When you select Play, Ascope loops continuously through all the rays in the data file. This is useful for watching a phenomenon evolve over time.
-
Select Pause and Speed to adjust the
end-of-loop pause and frame rate during playback.
The pause at the end of each loop can be up to 10 seconds, and the delay between successive rays can be up to 2 seconds.
- Select Cancel to return to normal Ascope operation.