
Calibrate Pane
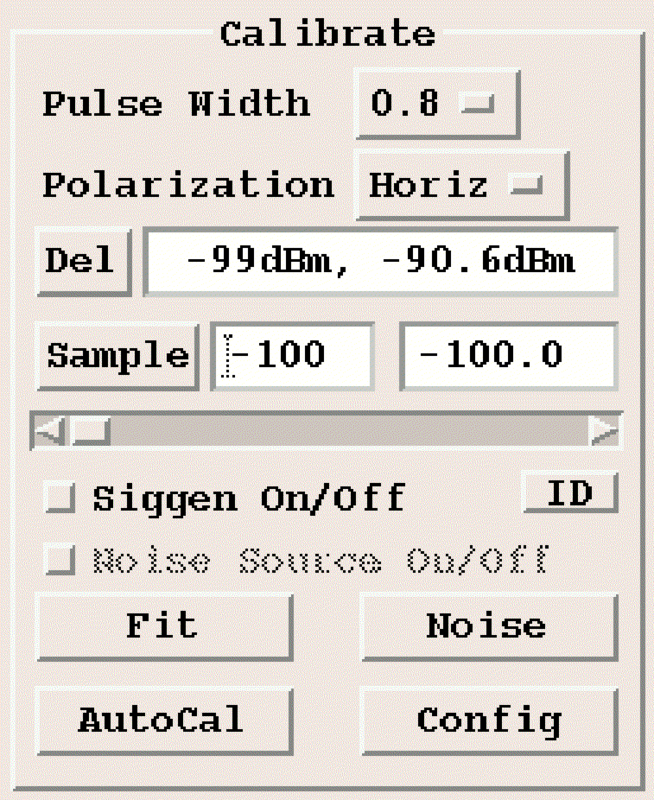
- Pulse Width
- Begins a new calibration at the specified pulse width, which you select from a menu. When you switch to a new pulse width, any prior data points and temporary results are discarded. Zauto lets you choose whether you want to save the calibration.
- Polarization
- On dual polarization radars, calibration must be performed separately for each polarization channel. Do not change this for other radars, as changing the polarization erases the current calibration points.
- Delete
- Select Delete to delete the last calibration point. Select Delete many times to delete successive points, in reverse order.
- Noise
- Select Noise to take a noise sample and plots the result. The noise sample must be taken after the least squares fit is done. For a manual siggen, you must turn the siggen to its lowest setting or disconnect it before taking a noise sample. Zauto does this automatically when the siggen is controlled by the RCI.
- Sample
-
Select Sample to generate and plot the specified test signal. In the field to the right of this button, you enter the desired siggen setting in dBm. For a manual siggen, you must set the siggen to match this setting. Zauto measures the power at IF, and plots the point on the calibration graph.
The siggen setting can be entered in one of the following ways:
- Type a number directly into the field.
- Move the slider within the sliding scale until the desired value is displayed in the field.
- Click inside the scale to move the slider in steps. The size of the step is defined in the AutoCal Configuration menu (see below).
- Siggen ON/OFF
- Use this button to toggle the siggen off before taking a noise sample, then toggle it on again.
- ID
- Identify which siggen is used in the calibration. This is helpful in the future when you want to compare new results to old calibration files.
- Fit
- Select Fit to cause Zauto to perform a least squares fit to the data points that lie within the specified range limits. The resulting line is drawn on the calibration plot. At least two points are needed. The Results display shows the slope and intercept values for the line.
- Automatic Calibration
-
Automatic calibration is available only if you have an automatic siggen.
Select AutoCal to generate a series of signals (beginning at the high end, ending at the low end) and plots them on the graph. When it is finished, a noise sample is taken and a least squares fit of the data points is taken. The calibration is then saved. See Defining Zauto Configuration Parameters.