

Configuring Protected Areas (Arenas) for TDWR
Protected areas are configured in the IRIS utility.
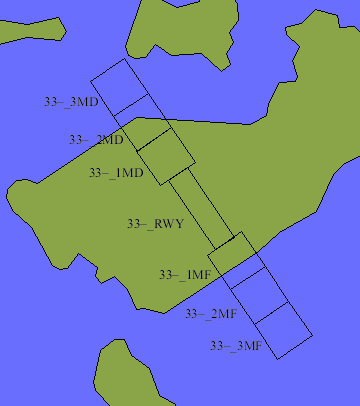
Arena Naming Convention
The naming convention used to designate runway corridors and protected areas (also called "arenas") is as follows:
-
The first 2 digits are the runway name, also referred to as the "corridor" name. In the example, this is "
33".Corresponding names for the reverse direction (runway 15) are made automatically.
Vaisala recommends that you use the convention of naming the "north bound" direction for a corridor.
-
The next position is used if there is a left and right runway. For example, use
33Rand33Lto indicate left and right runways.If there is only a single runway, use a dash as in the example, that is,
33–.Note, if the left and right runways are within approximately 500 m (1640 ft 5 in) of each other, it is easier to designate a single corridor for alert purposes rather than have 2 separate corridors that are almost completely overlapped.
- The next field is an underscore character which serves as a separator.
- The last 3 digits are used to specify the
"arena". In the example, "
1MF" specifies a protected area that extends from the end of the runway to 1 mile from the end of the runway. It is recommended that you use the textRWYto specify the runway itself.
Once you have decided the runway and arena names, construct the geometry of the protected areas, that is, the size and orientation information that is required in the IRIS utility. See IRIS and RDA Utilities Guide (M212925EN).
 | It is tricky to get the areas correct. To help you Vaisala provides an EXCEL spreadsheet that makes it easy to configure runway protected areas. Contact your Vaisala representative for a copy. |
After you have created your protected areas, test them with the Overlay utility. This requires that you have already configured the overlay for your system. See Overlay in IRIS and RDA Utilities Guide (M212925EN).
To see your protected areas on top of your overlay select .
The display shows you the protected areas. Zoom in as needed to see them. The areas are not labeled.
Verify that all the areas are present in the correct locations and that all of the edges are properly aligned. If not, quit Overlay and then go back to IRIS setup/product to edit and save the protected area information. Retest with Overlay to see if you got it right.