

Configuring Ribbon Display Software
 | To run the IRIS software for ribbon display support, your system must be licensed for this feature and you must have operator privilege. Check with your system manager. |
Overview
The ribbon display setup utility provides the following functions:
- Runway approach and departure corridors are assigned to each line of the display.
- Up to 8 displays can be configured for each IRIS workstation and the lines for each display can be set independently.
- Up to 4 configurations can be saved. This is used for installations where different active runway assignments may require different display layouts.
Configure Ribbon Displays Using the ribsetup Utility
After you have defined your protected areas, the ribsetup utility is used to define the appearance of the ribbon display, that is, what runway information is displayed on each line of each ribbon display.
To start the ribsetup utility you must be an operator. Open a terminal window and type:
$ ribsetup &The ribsetup utility appears as shown below:
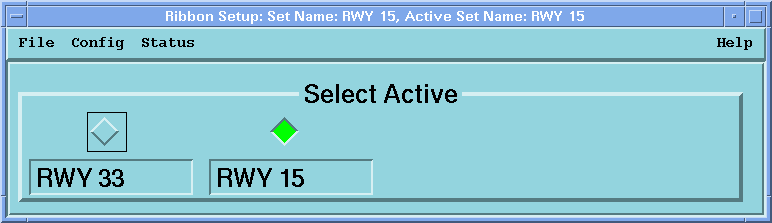
When the menu first comes up it is in "select" mode. You can select among up to four different configurations that have been pre-defined. In the previous example, 2 configurations are defined-one for runway 33 and the other for runway 15. The other 2 configurations are unused.
The configurations should be made to correspond to the actual runways that are typically used together in operation. When the terminal area is reconfigured in response to a new wind direction, this menu is used to select the appropriate ribbon display for the new configuration.
The features of the menu are described in detail below.
- File
-
This provides the functions
Load
Used to restore the menu from the currently-saved file configuration if you want to "undo" changes.Save
Saves your changes.Print
To print the menu for documentation purposes.Exit
To exit the menu. Note that ribbon displays remain active when you exit.
- Status
-
Select Status to see a submenu of the communication status of each of up to 8 ribbon displays that can be attached to your IRIS workstation.
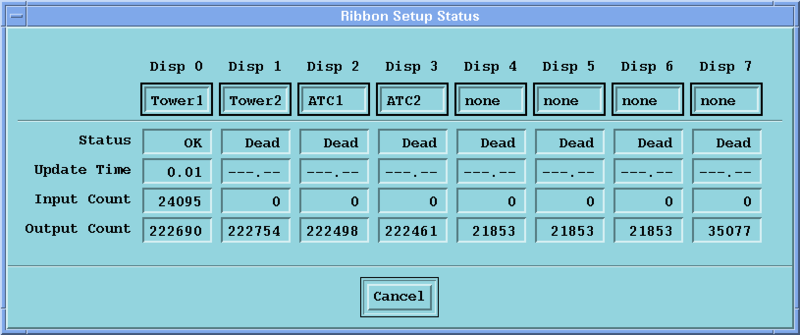
The top row of the menu shows the ribbon display numbers for 8 displays that could be connected to your IRIS workstation. Note that your system may have fewer than 8 displays. The second row shows the names that have been configured for the displays. The last four names are set to "none" to indicate that these are unused.
The status of each ribbon display is indicated as
OKorDead. ADeaddisplay may have been turned-off or have a cabling problem. Also, the display number set on the display itself may be incorrect (see Dale Ribbon Display General Use).The update time shows the time in seconds since the last communication between IRIS and the display. Input and output count are shown to indicate the number of bytes input from the display and output to the display. This is sometimes useful for debugging communications problems.
- Config
- The submenus under config provide the ability to customize the appearance of each ribbon display.
Config/Config ... (serial output port)
This selection determines which serial line output port is used for ribbon displays. Only a single port is needed since the displays are daisy-chained together. Type the device name in the form:
/dev/ttyXXXThe XXX depends on your system, for example:
- Linux
ttyS0orttyS1 - HP
tty0p0ortty0p1
Check with your IRIS System Manager if you are unsure.
Number of Active Sets (1, 2, 3, 4)
This determines how many different active sets you want. In the example, there are two active sets. You can name active sets by typing in the name that you want and selecting .
Display Setup Menu
This is turns on the setup menu. The setup menu is used to configure the ribbon display appearance for each active set.
The display configuration for an active set
can be viewed by pushing the button under the active set name. Note that this does not
change the active set on the ribbon displays, that is, it only effects what is displayed and
edited in the setup menu. The button turns yellow to indicate which set is being
viewed/edited. In the example, the setup menu is set to view RWY 15 (yellow
button).
The top of the setup menu shows the display
number and is color coded red or green to indicate whether display status is
OK or Dead. The display numbers correspond to the
"Selector" position (0 to 7) that is configured on each of the ribbon displays. It is
recommended that if, for example, you have 4 displays, that the selector switches on the
displays be set to 0, 1, 2, and 3.
There is also a button next to the Display Number to select whether a display is enabled or not. If a display is installed, the button should be clicked-in. In the example, the first four displays (0 to 3) are enabled, but displays 1, 2 and 3 are dead (read color) indicating that they are either turned-off or there is a communication problem.
Belowh each display number is a display name
(for example, Tower1). Set these to indicate the location or function of
the particular ribbon display. It is recommended that you use the text None
or Unused to indicate the case when a display is not installed. To change
the name, type the text.
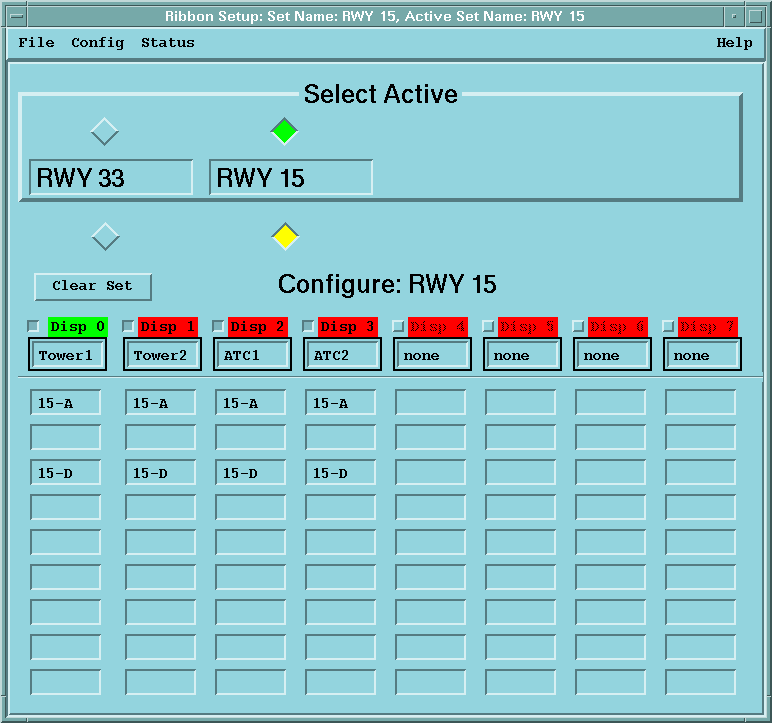
The bottom of the setup menu has 9 entries for each display, corresponding to the 9 lines that are available for warnings on a ribbon display. To configure what appears on each line, first highlight the line and then right-click the mouse to get a pop-up list of all possible corridors as shown below.
The corridor names are taken from the IRIS setup/product warning areas that were created (see the beginning of this section). In addition, there is a blank line (to configure blank lines on the display), and there are other arbitrary protected areas that may not be associated with a particular corridor. For example, a single large protected area could be configured to display alerts anywhere within 8 km (5 miles) of the terminal.
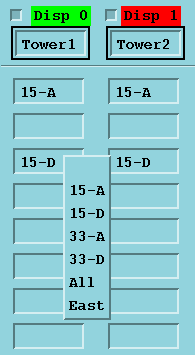
Select the corridor from the submenu for each line of the display. Repeat the procedure for all of the displays.
In the example, each of the four displays that are enabled is configured identically. In general this is good practice since it makes the system easier to maintain. If your operation requires it, different displays can have different configurations.
To assist with major changes, use the Clear All button. If you make a mistake, use to restore the saved values.
After you have configured a set, use to save your results. You may also want to do a to document your settings. Then you can click on a different set (yellow button under the set name) and configure the displays for this. Continue until you have configured all of the active sets.