

Slide Show Tool
You can use the Slide Show Tool to observe the motion, growth, and decay of radar echoes.
The Slide Show Tool can display different products from different times (while the animation tool is limited to a linear time sequence of one product). For example, in the following figure, different 4 slides of different products are shown in the Quick Look Window (QLW) for 10 seconds.
You can configure multiple windows so that images in different windows change at the same time.
 | For multiple window presentations it is convenient to use to configure the start-up window location, window size, and legend on/off. |
 | You can use Slide Show Tool for a weather briefing display for which there is no operator/observer control of the display. |
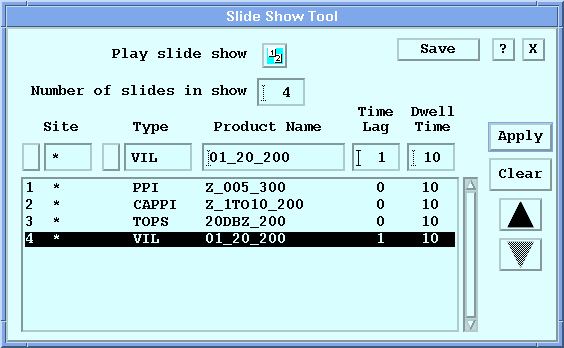
- Select the slide show icon to display the tool.
-
Enter the number of slides in Number of slides in show.
This field determines the number of slides in a show (maximum 16).
IRIS inserts the specified number of blank rows in the slide list.
You must populate each slide with information about the product it will display.
-
For each slide select the slide number (or row) and do the following:
-
Specify the Time Lag.
Time Lag specifies the version of the product according to the following rules:
0The current (most recent) version of the product.1The previous version of the product, that is, the second most recent.2Two products prior to the current version.
This enables the comparison of product versions. In a multi-window environment, the newest version of a CAPPI product can be displayed alongside a CAPPI product from the previous hour.
To make a single step time sequence, type the same product type, the name for each slide, and specify 0, 1, 2, ... for the lags.
-
Specify the Time Lag.
- To clear incorrect slide information, select the slide number (or row) and then Clear.
- Select Save.
- To start the show, select Play slide show or select the slide show icon in the legend.