

TRACK: Track/Forecast
TRACK products show the projected motion for storm features (centroids) based on a series of input products from different times.
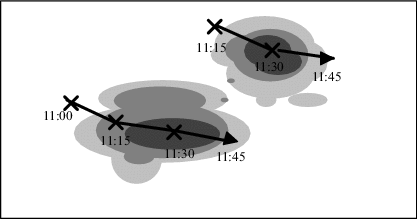
The TRACK product consists of a series of track points connected by lines, or "tracks." Each track shows the motion of one centroid over a specified time span, plus a forecast point showing where the centroid gives its current direction and speed. A TRACK product may contain multiple tracks if more than one centroid shows up in the input product, as shown in the following figure.
The input product can be any horizontal Cartesian product, such as a PPI product. The TRACK product applies the same logic as the warning product to locate the centroids within the input product. You define the threshold level and size of the centroids, below which weather features are ignored. When new data comes in, the TRACK product compares the previous TRACK product to the new data to obtain a motion vector. This information is used to define the new TRACK product, including the forecast point. Warnings are issued if a centroid hits, or is forecast to pass through, a protected area.
As new data comes in, the TRACK product must determine whether a new track point is an extension of a previous track, the start of a new track (when a centroid is born), or the end of a track (when a centroid dies). Track parameters, such as the maximum velocity and tolerance for new points, influence this determination.
TRACK is an overlay product created in the Quick Look Window.
- To create a new TRACK product, select .
- To load an existing TRACK product, select .
-
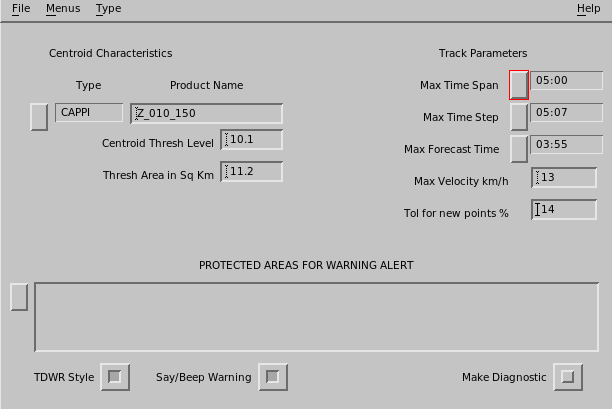
Configure the TRACK product:
- Product Type and Product Name
-
Select the input product type and then the product name that corresponds to the selected type. Note that there must be a product configuration file for the type of product you pick.
In the case of products received over the network, you can make a product configuration file or copy the file over the network.
- Centroid Threshold Level
-
The TRACK product considers only those centroids whose values meet or exceed this threshold level.
The units of measure depend on the selected product. For example, a TOPS threshold is specified in km, while a VIL threshold is specified in mm.

If you are uncertain about the units of measure, check the appropriate Product Configuration menu. - Threshold Area in Sq Km
-
Enter the minimum size of a centroid region (in sq km). Areas that do not meet or exceed this size are not tracked.
For example, for a 3 km by 3 km (1.9 × 1.9 mi) size area, enter "9".
- Max Time Span
-
Enter the maximum time allowed between the newest and oldest track points to be included in the TRACK product.
When a new input product is processed, points that are older than this time span are removed.
You set the time using the plus and minus button to increase and decrease the hours or minutes. Select Ok to exit the window. The time you specify is inserted into the field.
You may also type a time value directly in the Time window and select Ok.
- Max Time Step
- Enter the amount of time that can elapse between two points in the same track. If more than this amount of time has elapsed between the last point in a track and a new point coming in, the new point is considered the beginning of a new track.
- Max Forecast Time
-
Enter the amount of time to project ahead for forecast points.
The forecast time should be comparable to the lifetime of the feature that you are tracking.
For example, for an isolated severe storm, a forecast time of 30 minutes would be typical. For a squall line, a period of 1 hour could be used.
You need some experience with the types of weather in your part of the world.
- Max Velocity
-
Enter the maximum velocity allowed between two points in the same track.
If this velocity would be exceeded by a new point coming in, that point is considered the beginning of a new track.
A typical value for this field is 100 km/hr (62.1 mi/hr).
- Tolerance for New Points
-
Enter the margin of error that can exist between a new point and a forecast point.
If the new point is within the tolerance limit, it is added to the end of the track and a new forecast point is created.
If it falls outside the limit, a new track is begun.
- Protected Areas for Warning Alert
-
Specify one or more protected areas.
A warning is generated if a centroid falls within or is forecast to move into a protected area.
Select Protected Areas to see a list of areas. You can toggle choices on or off.
When you exit the list, the names of the selected areas are displayed in the field.
Protected areas are configured with the Setup utility. They are constrained to be rectangles with arbitrary size and orientation angle.
You can configure up to 32 areas. (If you make a change to Setup, you must restart IRIS for the change to take effect.)
- TDWR Style
-
IRIS supports two formats of warning messages. In TDWR format, only the strongest centroid in the highest priority area is reported along with its strength. For example:
"MBA 3MF 30K-, in spoken language: "Microburst Alert, Three Mile Final, 30 Knot loss".The older IRIS format reports all centroids in all protected areas, for example:
3 MBA warnings at 11:30 in: 3MF, 2MF. These messages are displayed at the bottom of the display screen and optionally spoken. - Say Warning
-
Select this option to have the product generator to verbally signal the warning message in addition to displaying it as a message.
In the IRIS menu, you must also select .
- Make Diagnostic Results
- In addition to the TRACK product, you can create a thresholded version of the input product, useful for testing purposes. Unless you encounter a problem with the TRACK product, you can turn this feature off.