

Configuring WARN Products
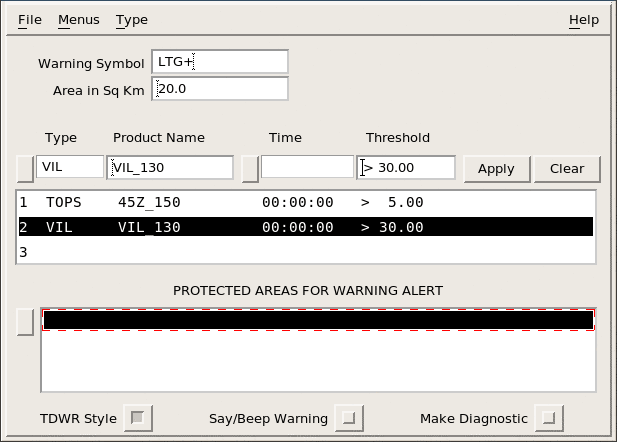
Use the
WARN product configuration menu to specify the message, the area of the
threshold region, up to 3 products to use as criterion for the warning, and up to 32
protected areas.
- In the main menu bar, select .
-
In the main menu bar, select .
The WARN Product Configuration menu opens.
-
In Warning Symbol, specify
the text used in the warning messages and the text displayed at the centroid position on
the situation display.
For example, the text may be, HAIL or MBW, S++, or TRW+.
-
Enter the minimum size of a thresholded region in the Area in Sq
Km field.
Areas that do not meet or exceed this size are discarded. Enter the desired value in square km.
For example, for a 3 km by 3 km (1.9 × 1.9 mi) size area, enter 9.
-
Select the button next to Product Type and Product
Name, select up to 3 products to be examined by the
WARNproduct.
- Products must have the same maximum product range per the respective Product Configuration menus.
- Products must have the same resolution per the respective Product Configuration menus.
- Products must be of a supported
data type:
dBT,dBZ,dBZc,Height,Kdp,LDRH,LDRV,R,Rain,RhoH,RhoV,RhoHV,Shear,SQI,Time,VIL,Width, andZDR.
Errors are reported at run time in the Radar Status menu.
-
Select the product name.
The list of product names shows products currently in your system. If the product you want does not show, run your system until it does show.
Alternatively, chose a different product of the desired type and override the product name.
-
For each product, enter the warning threshold in
Threshold.
The
WARNproduct considers only those values that meet or exceed the threshold. The units of measure depend on the selected product. For exampleTOPSthresholds are specified in kmVILthresholds are specified in mm.

Check the appropriate Product Configuration menu if you are uncertain about the units of measure. The
WARNproduct operates on the color bands in the product image and the threshold is set accordingly.For example, to set up a reflectivity warning based on a
CAPPIproduct.- Display an example of the product.
- Choose your threshold to match the number displayed with the color band that you want to use as your threshold.
If 45 dBZ is the number displayed with the red color, and you set your threshold to 45 dBZ, then all of the regions displayed as red (or "greater") are included in the warning algorithm. This is convenient for verifying the algorithm. If you display the reflectivity product along with the situation display (warning overlay), the centroid labels are positioned precisely in the red-colored regions.
For the
VVPproduct, the threshold refers to the divergence in units of m/s per km (10-3 s-1). When theWARNproduct is run for theVVP, a warning is generated if the divergence exceeds this value at any height in theVVP. Strong low-level divergence over the radar could be an indicator of a microburst. To properly set for microburst alerts, you must know the local characteristics of the phenomena.
-
Under Protected Areas for Warning Alert, select
Protected Areas to see a list of areas.
The protected areas are configured in the setup utility. They are constrained to be rectangles with arbitrary size and orientation angle. There is a limit of 16 areas. (If you make a change to Setup, you must restart IRIS for the change to take effect.)
It is a good idea to make a large area (for example, 500 by 500 km (310.7 × 310.7 mi)) named ALL. WhenALLis selected, the entire radar area out to 250 km (155.3 mi) range is a protected area. -
Select TDWR Style to use the TDWR warning message format.
In TDWR format, only the strongest centroid in the highest priority area is reported along with its strength. For example:
MBA 3MF 30K–, in spoken language: Microburst Alert, Three Mile Final, 30 Knot loss.The older IRIS format reports all centroids in all protected areas, for example: 3 MBA warnings at 11:30 in: 3MF, 2MF. These messages are displayed at the bottom of the display screen and optionally spoken.
-
Select Say/Beep Warning to have the product generator to audibly
signal the warning message in addition to displaying it as a message.
You must also select Enable Speech from the IRIS Setup menu.
-
Select Make Diagnostic for the product generator to create
additional diagnostic output.
The diagnostic is a
USERproduct type, with aUSERdata type, and the same name as theWARNproduct, except for aMSK.You can display this product in the IRIS Radar Quick-Look Window.
This product contains the output of the initial thresholded input data. The LSB is the first input, bit 1 is the second, and bit 2 is the third. For a
WARNof only one input, expect a binary file. You can use this to see the regions being processed.