

Configuring SRI
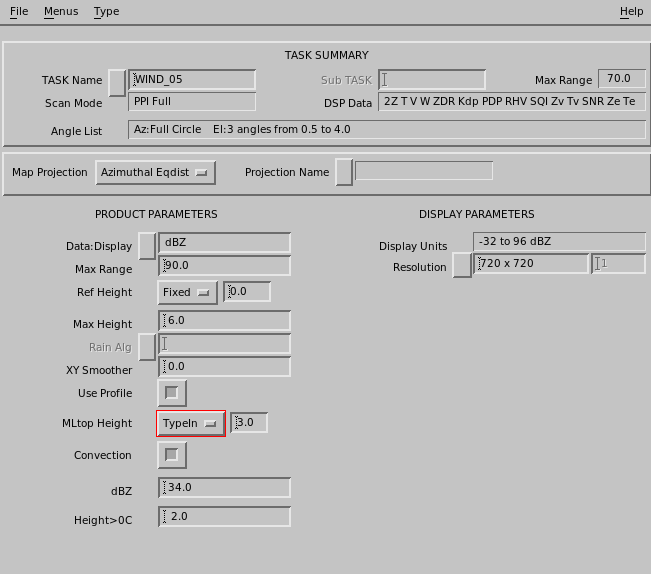
SRI provides input for the RAIN1 product to obtain the best possible estimates of accumulated precipitation even at longer ranges from the radar.
- Select .
-
For DSP Data and Data:Display,
SRI products require
TandZvalues as input.Make sure that both are recorded in your task.
For Data:Display you can select if you want to see the result in
dBZor in intensity mm/h (dBZ:R) .In
dBZcanddBZc:R, thecrefers to the included corrections for attenuation, beam blockage, and similar as configured for the task. Even if you display mm/h, the convection threshold is given indBZ.For radar systems that import data, the SRI product can also run without
T(Total power) data. In a such a mode, the "lowest clutter-free bin" feature is unavailable, but the product can still be run. -
In Ref Hgt, select the reference height to which the
reflectivity profile of the SRI product is calculated.
-
Fixed
Type the height (km). This is height above 0 reference.
-
Map
IRIS retrieves the height information from a terrain map file. See Format of Terrain Map File.
-
-
In Max Height, set the maximum height where the "lowest clutter
free bin" is searched for.
If there are no clutter free bins below this height, no correction is performed.
You must set a reasonable level, such as below 5 km (3.1 mi). Note that at far ranges, when the lowest beam is above the Max Height, the lowest beam is used.
-
To use a profile in the correction, enable Use profile.

This is an easy way to switch the correction temporarily off. You do not need to change other places of your production chain. -
In 0C Height, select the height of the melting level with one of
the following options:
-
Ingest
The height of the melting level is extracted from the Setup on the radar computer at the time of the measurement. (This is important if you process archived data.)
All the other gradient numbers are pulled from the current setup on the product computer.
If you have a network of radars and make the products centrally in one IRIS analysis, you can set an individual melting level for each radar at the Setup of the IRIS radar and use the Ingest setting here.
-
Setup
IRIS uses the melting level heights given in on the product computer.
If you want to use the same melting level for all radars and keep adjusting just one value, use the Setup option here.
-
Type-In
When you are testing the product interactively, use Type-In to type the value.
-
-
Convection is an area of strong (precipitation) echo above melting layer. For
Convection, do one of the following:
-
Enable Convection to be able to define criteria to determine whether precipitation is convective or large scale, and only the latter is corrected.
-
In the first box, type the threshold (in dBZ). Determine this value using the intensity of convection in your locale.
Typically a value of 35 ... 40 dBZ is appropriate for most locations in mid latitudes, 20 dBZ in cool climates.
-
In the second box, type the convective top height (how much above melting layer it should be, in km) in the next box.
This is typically 1 ... 2 km (0.6 ... 1.2 mi) to allow some clearance above the bright band.
The suitable value for threshold height depends of the accuracy of the melting level height estimate. The smaller the value, the more often pixels are considered convective.
-
-
Disable Convection to have all precipitation corrected with the above given profile.
-